
New homeowners often think cleaning air ducts is a once-and-done job. That sounds logical at first, yet most HVAC experts recommend full duct inspections at least twice a year to keep air quality and airflow consistent. Surprising, right? It turns out that skipping regular checks can lead to dust, mold, or even pest troubles that quietly damage your system and drive up energy bills faster than you’d expect.
Table of Contents
- Step 1: Assess Your Current Duct System
- Step 2: Gather Necessary Tools and Materials
- Step 3: Prepare Your Home for Duct Cleaning
- Step 4: Clean the Ducts and Vents Thoroughly
- Step 5: Inspect and Verify Airflow Quality
- Step 6: Schedule Regular Maintenance Checks
Quick Summary
| Key Point | Explanation |
|---|---|
| 1. Assess your duct system first | Conduct a thorough inspection for dust, mold, and pests to identify issues early. |
| 2. Gather essential cleaning tools | Use protective gear and efficient equipment like HEPA vacuums to ensure effective cleaning. |
| 3. Prepare home before cleaning | Clear spaces around vents and relocate fragile items to facilitate a smooth cleaning process. |
| 4. Perform thorough duct cleaning | Follow a systematic approach, ensuring all sections are cleaned to improve air quality. |
| 5. Schedule regular maintenance checks | Inspect ducts bi-annually and replace filters regularly to avoid build-up and maintain efficiency. |
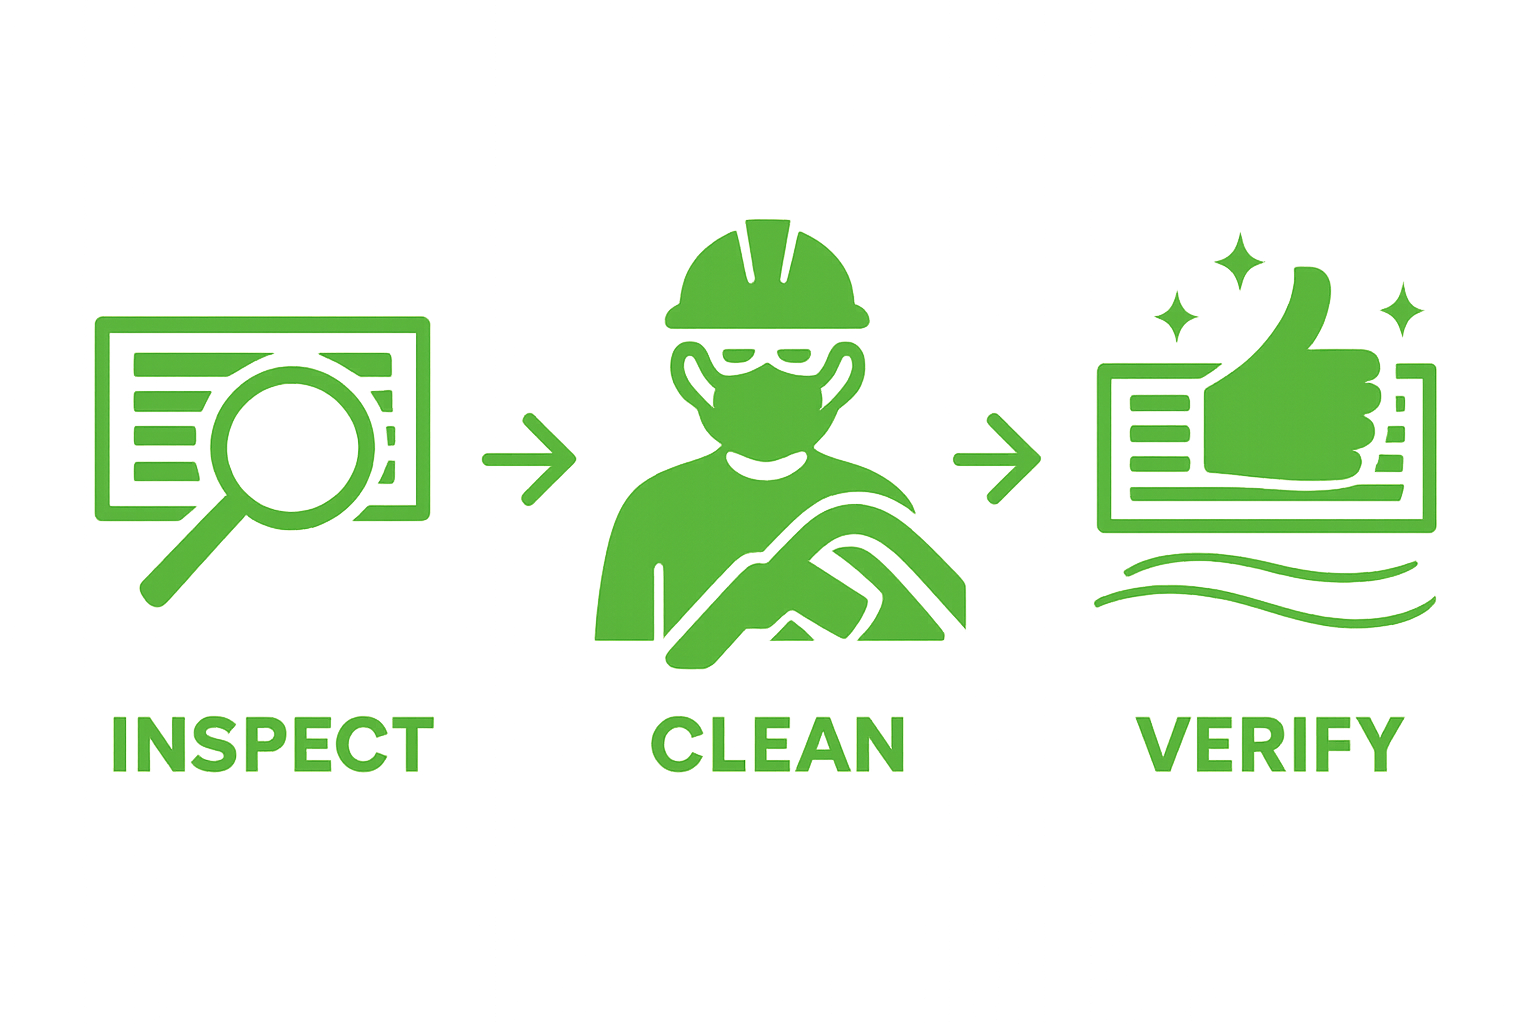
Step 1: Assess Your Current Duct System
As a new homeowner, understanding your home’s air duct system is crucial for maintaining indoor air quality and ensuring efficient HVAC performance. The assessment stage is your first critical step in duct cleaning that will help you identify potential issues and determine the best approach for maintaining your home’s ventilation system.
Begin by gathering the necessary tools for a comprehensive inspection. You will need a flashlight, a small mirror, protective gloves, and a camera or smartphone to document any findings. Natural light works best, so choose a time of day when sunlight can help illuminate the darker recesses of your ductwork. Open all registers and return air grilles to get a complete view of your system.
Carefully examine the visible portions of your ductwork for signs of potential problems. Look for accumulated dust, debris, visible mold growth, or signs of pest infestation. Pay special attention to areas near vents, around your HVAC system, and in less frequently accessed spaces like attics and crawl spaces. The comprehensive air duct inspection guide can provide additional insights into what to look for during your assessment.
According to the U.S. Environmental Protection Agency, key indicators that your duct system needs attention include:
- Visible mold growth inside or outside of ductwork
- Excessive dust or debris buildup
- Unexplained musty or stale odors when the HVAC system runs
- Inconsistent airflow between different rooms
If you discover any of these signs, it may be time to consider a professional duct cleaning service. Take detailed notes and photographs to help professionals understand the specific condition of your ductwork. This initial assessment will not only help you maintain a healthier home environment but also prevent potential expensive repairs down the line by catching issues early.
Step 2: Gather Necessary Tools and Materials
Preparing for a thorough duct cleaning requires more than good intentions. The right tools and materials can transform your duct maintenance from a potential disaster to a successful home improvement project. Before diving into the cleaning process, assembling a comprehensive toolkit will ensure you can tackle the job efficiently and safely.
Start by collecting personal protective equipment to shield yourself from dust, debris, and potential allergens. You will need safety goggles to protect your eyes, disposable respirator masks rated for fine particulate matter, and thick work gloves that can withstand potentially sharp metal edges. Comfortable clothing that covers your arms and legs will also help prevent skin contact with accumulated dust and potential irritants.
Your cleaning arsenal should include several key tools. A powerful vacuum with a HEPA filter is essential for capturing fine particles without releasing them back into your home environment. The professional duct inspection guide recommends additional specialized equipment for a thorough cleaning. Supplemental tools will make your job easier and more effective:
- Extendable flashlight with adjustable brightness
- Soft-bristled brushes of various sizes
- Microfiber cloths for wiping surfaces
- Compressed air canister for dislodging stubborn debris
- Telescoping mirror for hard-to-reach areas
- Drop cloths to protect flooring during the cleaning process
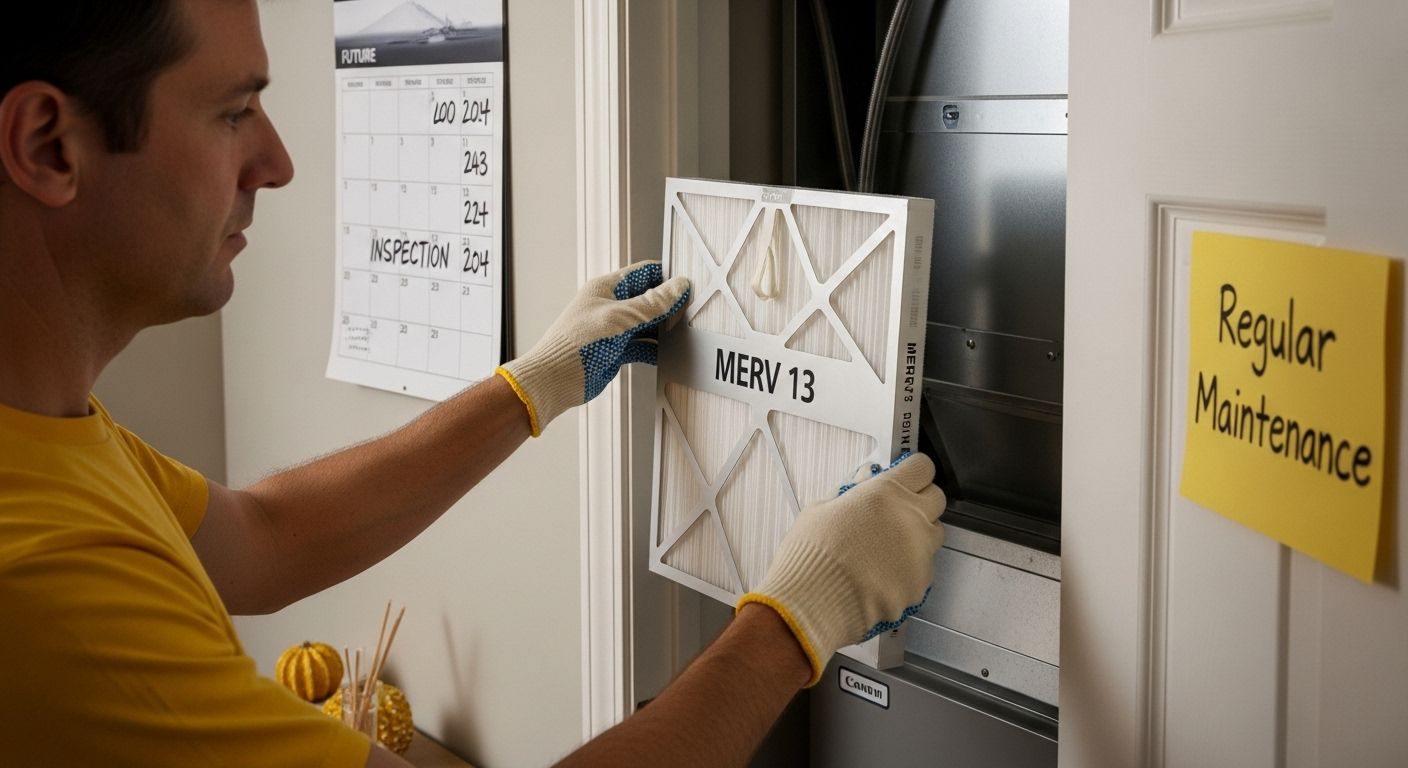
According to CDC guidelines, selecting the right filter for your HVAC system is crucial. Consider investing in high-efficiency filters with a MERV rating of 13 or higher to improve overall air quality. These specialized filters trap smaller particles more effectively than standard options, providing an additional layer of protection for your home’s ventilation system.
Before beginning, verify that all your tools are clean, functional, and easily accessible. Organize your equipment in a portable container or tool belt to minimize disruption during the cleaning process. Having everything prepared in advance will help you work more efficiently and reduce the likelihood of interrupting your project midway through.
Below is a summary table of recommended tools and materials for duct cleaning, along with their purposes and key notes for safe and effective use.
| Tool/Material | Purpose | Key Notes |
|---|---|---|
| Safety goggles | Eye protection during inspection/cleaning | Prevents dust, debris, and allergens exposure |
| Respirator mask (N95+) | Protects from inhaling fine particles | Disposable; rated for particulate matter |
| Thick work gloves | Hand protection from sharp edges/debris | Durable; covers wrists |
| HEPA vacuum | Removes dust, debris, and allergens | Essential for containing fine particles |
| Extendable flashlight | Illuminates duct interiors | Adjustable brightness for detailed view |
| Soft-bristled brushes | Loosens and removes debris | Different sizes for various duct sections |
| Microfiber cloths | Wipes down vent covers/surfaces | Traps dust effectively; reusable |
| Telescoping mirror | Hard-to-reach inspection | Useful for confined, deep duct spaces |
| Drop cloths/plastic sheeting | Protects flooring and furniture | Minimize spread of dust during cleaning |
Step 3: Prepare Your Home for Duct Cleaning
Preparing your home for a comprehensive duct cleaning is more than just clearing a pathway. This critical step ensures a smooth, efficient process that protects your living space and helps professionals complete their work effectively. Think of it as creating a clean, accessible environment that allows technicians to move and work without unnecessary obstacles or potential damage.
Start by clearing the areas around your air vents, registers, and return air grilles. Move furniture at least three feet away from these openings to provide unobstructed access. Delicate items like artwork, electronics, and breakable decorations should be carefully relocated to prevent accidental damage from dust or equipment movement. Cover valuable furniture with drop cloths or plastic sheeting to shield them from potential debris during the cleaning process.
Your home’s interior preparation goes beyond physical obstacles. Best practices for home maintenance recommend taking additional protective measures. Secure loose items on shelves, remove lightweight curtains, and consider temporarily relocating sensitive items like houseplants or pet habitats. If you have animals, arrange for them to be in a separate, sealed room or offsite during the cleaning to minimize stress and prevent interference with the technicians’ work.
According to EPA recommendations, communication with your cleaning professionals is key. Contact the service team in advance to discuss specific preparation requirements unique to your home. Some practical steps to consider include:
- Ensuring clear access to your HVAC system
- Removing valuable or fragile items from work areas
- Identifying any known problem areas in your ductwork
- Providing information about recent home renovations or known issues
Finally, verify your preparation by walking through each room and checking that pathways are clear, vents are accessible, and potential obstacles are removed. A well-prepared home not only facilitates a more thorough cleaning but also protects your belongings and reduces the overall time required to complete the service.
Step 4: Clean the Ducts and Vents Thoroughly
Cleaning your home’s ductwork is a meticulous process that requires patience, precision, and the right approach. This critical step transforms your HVAC system from a potential source of contamination to a clean, efficient pathway for air circulation.
Your goal is to remove accumulated dust, debris, and potential allergens that have been silently building up over time.
Begin by turning off your HVAC system completely to prevent dust and debris from circulating during cleaning. Create negative air pressure by using a powerful vacuum with a HEPA filter connected to the main duct line. This technique helps prevent dust from spreading throughout your home during the cleaning process. Explore our expert guide on advanced cleaning techniques to understand the nuanced approach professional technicians use.
Start with the return air registers and supply vents. Remove the vent covers carefully and use your vacuum’s brush attachment to thoroughly clean the visible surfaces and edges. For stubborn dirt, use a soft-bristled brush and microfiber cloth to gently dislodge and capture accumulated particles. Pay special attention to the first few inches inside the ductwork, as this area typically collects the most significant amount of dust and debris.
According to EPA guidelines, comprehensive duct cleaning involves more than surface-level treatment. Your cleaning process should include:
- Systematically working through each duct section
- Using specialized brushes to loosen compacted debris
- Carefully vacuuming out dislodged particles
- Checking for and addressing any signs of mold or moisture
- Ensuring no areas are left untouched
Complete your cleaning by replacing vent covers, ensuring they are securely fastened. Turn on your HVAC system and run it for several minutes with a fresh, high-efficiency filter to capture any remaining loose particles. A successful cleaning will result in clearer airflow, reduced dust accumulation on surfaces, and a noticeable improvement in your home’s overall air quality.
Step 5: Inspect and Verify Airflow Quality
After completing the duct cleaning process, verifying your system’s performance becomes crucial. This final inspection ensures that your hard work has genuinely improved your home’s air circulation and overall HVAC efficiency. Think of this step as your quality control checkpoint, where you confirm that every effort invested in cleaning has delivered tangible results.
Temperature and airflow consistency are the primary indicators of successful duct cleaning. Begin by turning on your HVAC system and walking through each room, paying close attention to the air coming from different registers. Notice whether the airflow feels strong and uniform across various spaces. Rooms that previously felt stuffy or had weak air circulation should now demonstrate more balanced and robust ventilation. Explore our comprehensive air duct inspection guide for additional insights into professional assessment techniques.
Utilize a simple yet effective method to measure airflow quality. Hold a tissue or lightweight piece of paper near each register and observe its movement. A healthy, clean duct system will cause the paper to flutter consistently, indicating strong and unobstructed air movement. Significant variations in paper movement between different registers could signal remaining blockages or potential ductwork issues that might require professional attention.
According to EPA recommendations, thorough post-cleaning verification should include several critical observations:
- Check for any unusual odors when the system first starts
- Monitor system noise levels for changes
- Observe temperature consistency across different rooms
- Look for reduced dust accumulation on surfaces
- Note any improvements in overall air quality
Finalize your inspection by replacing your HVAC filter with a high-efficiency option. This final step not only maintains the cleanliness you’ve achieved but also helps prevent future dust and debris accumulation. A successful duct cleaning process will result in cleaner air, more efficient HVAC performance, and a noticeable improvement in your home’s overall comfort and air quality.
Use this checklist table to review each step after duct cleaning, ensuring all quality checks are performed for optimal system performance.
| Verification Step | What to Look For | Outcome if Passed |
|---|---|---|
| Test airflow from each register | Consistent and strong airflow | Balanced air circulation |
| Observe for unusual odors on system start | Absence of musty/stale smells | Clean, odorless airflow |
| Check system noise levels | No abnormal or increased noises | Normal HVAC operation |
| Inspect room temperature consistency | Even temperature across all rooms | Improved comfort |
| Monitor dust accumulation on surfaces | Noticeable reduction post-cleaning | Cleaner indoor environment |
| Replace HVAC filter with high-efficiency option | Proper fit and installation | Maintains clean airflow |
Step 6: Schedule Regular Maintenance Checks
Maintaining the pristine condition of your newly cleaned ductwork requires more than a one-time effort. Regular maintenance checks are the key to preserving your HVAC system’s efficiency, ensuring ongoing air quality, and preventing potential future issues. Think of these periodic inspections as routine health checkups for your home’s respiratory system.
Establishing a consistent maintenance schedule is crucial for long-term duct performance. Most HVAC professionals recommend comprehensive inspections at least twice a year – typically during spring and fall seasons when your system transitions between heating and cooling modes. Learn more about professional maintenance strategies to develop a robust home maintenance approach. During these checkups, technicians will thoroughly examine your ductwork for any signs of dust accumulation, potential mold growth, or structural integrity concerns that might have developed since your last cleaning.
Home maintenance isn’t just about professional visits. Develop a proactive personal maintenance routine that complements professional inspections. This includes monthly visual checks of your vents and registers, replacing HVAC filters every three months (or more frequently if you have pets or live in a dusty environment), and monitoring your system’s overall performance. Pay attention to subtle changes like unusual noises, inconsistent airflow, or unexplained increases in energy bills, as these could indicate underlying duct system issues.
According to EPA guidelines, effective maintenance involves more than just visual inspections. Consider these critical aspects during your regular checks:
- Inspect visible ductwork for dust buildup or damage
- Check and replace air filters consistently
- Monitor indoor air quality and system performance
- Listen for unusual sounds from your HVAC system
- Watch for unexplained temperature variations
By committing to a structured maintenance approach, you’ll protect your initial duct cleaning investment, maintain optimal indoor air quality, and potentially extend the lifespan of your entire HVAC system.
 Remember, consistent care is always more cost-effective than emergency repairs or complete system replacements.
Breathe Easier in Your New Home—Let Experts Handle the Hardest Part
Have you discovered signs of dust, uneven airflow, or worrying odors in your home’s ductwork during your recent inspection? As a new homeowner, it is natural to feel concerned about your indoor air quality and the risk of hidden mold or unseen buildup. This step-by-step guide helps you understand how crucial a proper duct assessment and cleaning are for your family’s health and your HVAC investment, but managing it all can be overwhelming on your own—especially when safety and truly thorough results are your highest priorities.
Choose peace of mind with Green Home Duct Cleaning, serving San Antonio and Austin. Our experienced technicians use eco-friendly, advanced cleaning techniques—just like the ones described in our air duct inspection guide—to ensure your ducts are spotless and your airflow is healthy. Get rid of allergens and persistent dust for good. Schedule your service today at Green Home Duct Cleaning and take the confident next step in protecting your investment. Your home deserves clean air right now.
Frequently Asked Questions
What is the importance of assessing my current duct system before cleaning?
Assessing your duct system helps identify potential issues such as mold growth, pest infestations, or excessive dust, which can impact indoor air quality and HVAC efficiency.
What tools do I need for cleaning my air ducts effectively?
Essential tools include safety goggles, a respirator mask, thick gloves, a powerful vacuum with a HEPA filter, soft-bristled brushes, microfiber cloths, and a flashlight. These tools help ensure a thorough and safe cleaning process.
How can I prepare my home for duct cleaning?
Clear furniture and obstacles around air vents and registers, cover valuable items with drop cloths, and communicate any known issues to your cleaning professionals. Ensuring clear access helps technicians work more efficiently.
How often should I schedule maintenance checks for my duct system?
It’s recommended to schedule professional duct inspections at least twice a year, typically during spring and fall, to maintain optimal airflow, identify issues early, and ensure good indoor air quality.